How to Properly Remove Badges
Dealerships add their own branded badges and decals to the vehicles on their lots as a way to advertise. 99% of people won’t remove the decals after purchasing a vehicle, so the dealership gets free advertisement for the vehicle’s entire life. For that 1% that isn’t interested in providing free advertisement and wants to remove that ugly badge, here are a few tips on how to do it.
The majority of this advice works for 3D badges or flat decals.
Before Removal
Prior to getting down to business with the decal itself, you’ll want to prep the area. Just use normal automotive soap and warm water to clean the area around the badge; that will prevent the dirt from damaging the area or getting in the way of your removal. Feel free to wash the whole vehicle while you have the soap and water out!
The Removal Process
Most dealership badges are held on by adhesive, like a shiny 3D sticker. That means that the process for removing a badge and a decal are pretty much the same. The key to getting a clean removal is undertaking the project under proper conditions.
The warmer it is, the easier it will be to remove the badge. That means that waiting for a hot, sunny day will ease the process. If the sun’s heat isn’t enough, or you are tackling the project in your garage, you can use a hairdryer to heat up the adhesive. Be careful though – hairdryers are actually quite hot and prolonged exposure could damage your paint. We only recommend using the hair dryer to apply heat for 30 seconds at a time.
The warmer it is, the easier it will be to remove the badge. That means that waiting for a hot, sunny day will ease the process.
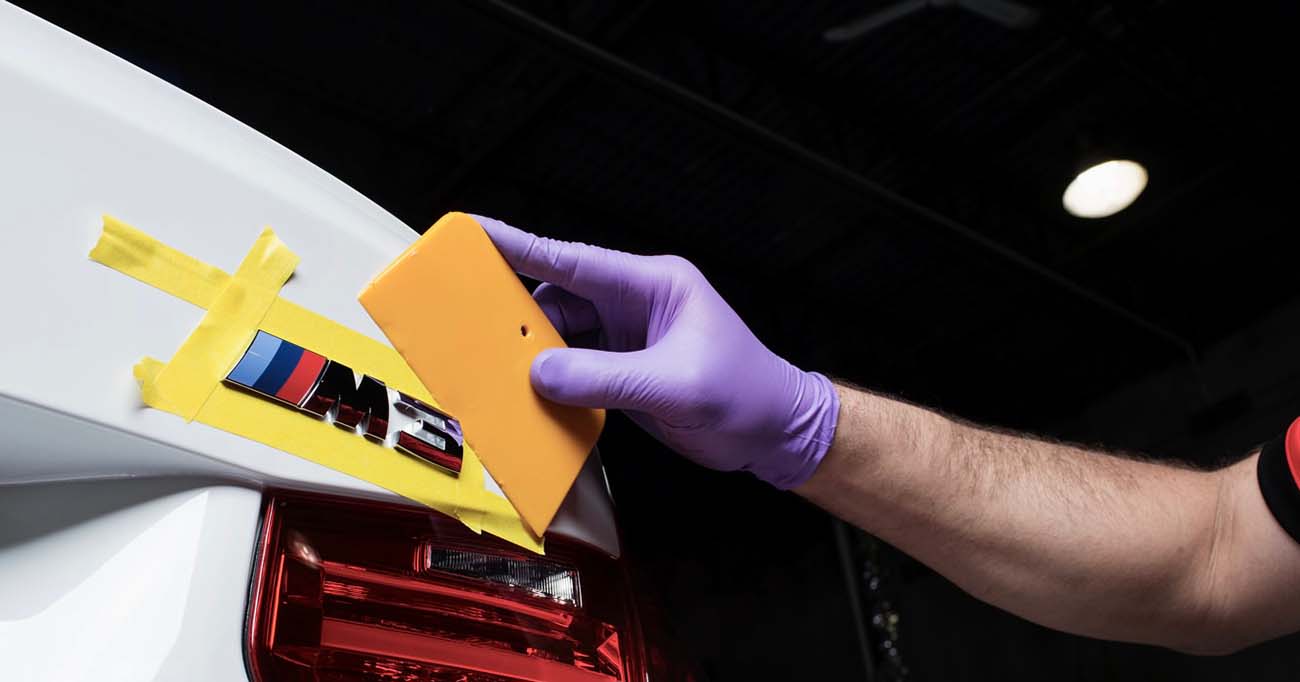
Once the glue is warmed up, you can begin removing the badge. Have patience with this process, as the decal or badge will respond well to consistent pressure. If you can’t get purchase on the badge with your fingers, you can try to slip a piece of dental floss behind the badge and use a sawing motion, or use a credit card or plastic spatula to pry off the badge. Never use anything metal, as you will likely damage the paint.
A badge will probably come off as one piece, but a laser-cut decal will be more likely to come off in pieces. Again, persevere and use patience – your vehicle will look awesome once it’s all done.
Pro tip: If heat isn’t enough to loosen the decal or badge, use a spray-on adhesive remover to help dissolve the glue. Keep spraying as you peel away.
Cleanup
Once the badge is gone, you are almost done. There will probably be a little residual adhesive left behind, and you should deal with this before it attracts dirt and grit, scratching your paint.
Use a dedicated adhesive remover (such as Goo Gone or 3M Adhesive Remover) to get rid of the residue quickly and easily, or use WD-40 if you don’t have any specific adhesive remover product lying around (WD-40 might require a little more elbow grease, but it will work). Once you’ve cleaned away all the residue, give the paint another soap-and-water clean to get rid of any chemicals that are still there.
Dealership badges can be annoying and unsightly, but with the right products and a little bit of effort, they are not too difficult to remove. Need a little help? Or maybe you think that your newly de-badged ride deserves a full detail? Give us a shout right here.